Collecting seashells at the beach is something many people do almost instinctively. They’re small, beautiful, and each one feels like a tiny piece of the ocean you can take home. Instead of leaving them forgotten in a jar or drawer, you can transform them into meaningful coastal artwork that preserves your memories in a creative and lasting way.
This guide walks you through the idea in depth and gives you a clear, step-by-step process to create your own “coastal masterpiece.”
Why Create Art from Seashells?
Seashell crafts are more than just decoration—they combine memory, creativity, and sustainability.
- Personal meaning: Each shell represents a specific trip, beach, or moment.
- Eco-friendly: You’re reusing natural materials instead of buying new ones.
- Creative expression: No two pieces will ever be the same.
- Relaxing activity: Crafting can be calming and therapeutic.
Ideas for Coastal Masterpieces
Before starting, decide what you want to create. Here are some popular options:
- Framed shell art (patterns, hearts, initials, landscapes)
- Decorative mirrors with shell borders
- Candle holders or jars
- Shadow boxes with sand and shells
- Jewelry (necklaces, bracelets, earrings)
- Wall hangings or mobiles
Materials You’ll Need
Most projects use simple, affordable supplies:
- Collected seashells
- Warm water and mild soap
- An old toothbrush (for cleaning)
- Glue (hot glue gun or strong craft glue)
- A base (canvas, wood board, frame, or glass jar)
- Optional: paint, varnish, sand, rope, beads
Step-by-Step Guide
Step 1: Collect Your Seashells Thoughtfully
While at the beach:
- Choose shells that are clean, intact, and dry
- Avoid taking shells with living creatures inside
- Pick a variety of shapes, sizes, and colors for more creative flexibility
💡 Tip: Take only a reasonable amount—respect the natural environment.
Step 2: Clean and Prepare the Shells
Once home:
- Soak shells in warm, soapy water for a few hours
- Scrub gently with a toothbrush to remove sand and debris
- Rinse thoroughly
- Let them dry completely (this is important for glue to work properly)
Optional:
- Soak in a mix of water and a little bleach (if needed) to remove odors
- Apply a clear varnish later for shine
Step 3: Plan Your Design
Before gluing anything:
- Lay out your shells on your base surface
- Experiment with patterns or shapes
- Take a photo of your layout so you can recreate it easily
Common design approaches:
- Symmetrical patterns
- Random natural arrangement
- Themed shapes (heart, wave, initials)
Step 4: Start Assembling
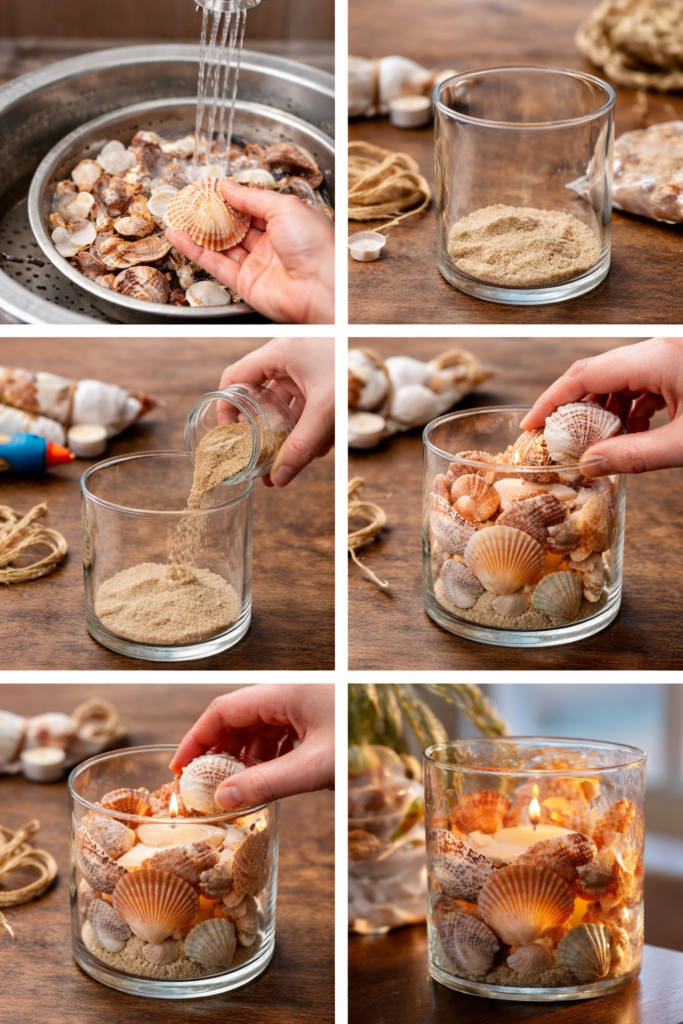
Now it’s time to build your artwork:
- Begin with larger shells as the foundation
- Add smaller shells to fill gaps
- Use a glue gun or strong adhesive
- Press each shell firmly and hold for a few seconds